
March 14, 2009 / 9:11
Ok, time for some useful information about shaving. Like . . . a trick that every girl learned from her mom, but most crossdressers probably never had the opportunity to pick up.
.
I’m sure you heard from your dad, however, to shave in the opposite direction of hair growth when you shave your face. Or if you use an electric razor, you have to go in circles AND up and down. Well the same goes for the rest of your body (mostly), which makes sense . . . but most people don’t realize what direction their hair actually grows. Actually, I know a lot of girls who don’t even bother trying to figure it out because their hair is fine enough that it doesn’t matter. But for crossdressers with coarse hair, this can make a huge difference.
.
Before going into details, let me just say that if you have long hair (ie first time shaving or it’s been awhile), make a first pass over everything WITH the hair growth – your razor was designed for a certain hair length, and if your hair is too long it will pull the skin up close to the blade (like it’s supposed to) and then clog up and pull the hair instead of cutting or worse yet pull the skin too hard and nick you. In either event, your skin will swell a bit and your final pass will just cut and scrape you up instead of giving you a nice clean shave. Shaving with the hair prevents the blades from pulling the skin close to the blade and instead just chops off the long part of the hair, leaving stubble that you can take off with your final pass which will go AGAINST the hair growth.
.
Now that that’s out of the way . . . your body hair grows in circles. Yes, really. But that’s ok, they’re predictable circles. We’ll start at the top and work down. Back hair for the most part grows down and towards your spine. Forget about shaving this exactly with the growth on the first pass (try just shaving up, that should work), but for the final pass this is rather convenient because shaving up and out (towards your shoulder) is a reasonably natural motion. At least, as natural as shaving your own back can be . . . And just for clarity, “out (towards your shoulder)” is in a different direction for your left and right side.
.
Moving to your front, chest hair grows in a similar pattern – the upper chest hair largely points to the center of your chest, while hairs around your nipples and lower point a bit more downward but still somewhat inwards. Hairs close to your nipples probably make a bit of a swirl pattern, growing around the nipple but usually never growing upwards. That means if you start with an up-stroke shaving your chest, you will mostly be trimming longer hairs but also catching the handful of hairs the grown downwards. Then finish with an out-stroke to get a smooth finish on the majority of hairs that grow inwards. Go around the left side of your nipples starting from the bottom and going left, up, and around to the top. Go around the right side of your nipples starting from the bottom and going right, up, and around to the top. Don’t shave over your nipple directly unless you want to take it off though! Getting the center of your chest and over your collarbone is tricky, but do it the same way you shave your jaw-line – skin is stretchy, so pull it away from the edge of the bone so that it’s (relatively) flat and taught. Don’t be tempted to press hard to shave a concavity (like the center of your chest) because it won’t work and is almost guaranteed to cut you in the process.
.
Underarms, this is an interesting one. Underarm hair grows in 3 directions – down (at the bottom), up (at the top), and towards your back (center). I usually shave up first, then down, and then towards my chest – this last direction hits some of the more sensitive hairs and goes over some large muscle ridges, so do it carefully. But if you don’t shave all 3 directions you’ll end up with ugly stubble. Again, be careful to flatten the skin as much as you can, and don’t press hard. These ridges are mostly muscles, so just relax your arm as much as you can, and you should be able to get them to go away (though maybe only one at a time).
.
Arms . . . arm hair on the side near your thumb grows down, so you can take out most of it with nice easy upwards strokes (towards your shoulder). Hair on the other side of your arm though grows in a couple directions. Some of it is down, much of it grows around your arm (towards your inner arm, the side without much hair), and some of it right near your wrist actually grows up.
.
Most belly hair grows down and slightly inwards. Hair around the navel grows towards the navel though, so you’ll need to take some little strokes in each direction out away from your navel.
.
Butt hair (don’t laugh!) grows in two directions. Mostly it grows down, however, the closer you get to the center of your body, the more hairs point inward. You’ll probably need to cover your entire butt with both up-strokes and out-strokes. Hair on your perineum (between your butt and your balls) grows towards your back, as does hair on your balls. Hair around the edge of your penis points down the shaft. Be really careful with this hair though, it’s super sensitive.
.
Hair on the front and back of your thigh grows down, but hair on the sides points around the leg towards the back. This goes for hair near your crotch too, which can be really difficult to shave. Don’t forget that skin stretches – if you pull it down your leg and go over the area, then pull it in to your crotch and go over it again, you can usually pick up all the hair though.
.
Hair on the lower legs grows down, and hair on the feet grows towards your toes. These are actually really easy areas to shave if you’re just very careful about bones and joints. Don’t try to just go straight over a ridge or protrusion, slow down and make sure the razor stays on a flat surface. That means you’ll have to shave each face of the joint separately, and then move the skin a bit to shave the apex. But you won’t have any cuts if you do that!
.
And that’s it, now you’re all clean shaved and sexy smooth 
Tags:
hair direction,
razor,
shaving,
shaving chest,
shaving direction,
shaving legs,
smooth shave —
Posted by: admin | Category:
personal hygiene |
Comments (11)
February 28, 2009 / 6:40
For many tgirls, nail polish is one of their first forays into the mysterious world of makeup. Painted toenails can remain hidden under socks and shoes, so it’s safe. And I’ve known a lot of genetic girls who have a fascination with painting guys nails . . . so you can always claim your girlfriend did it to you! Not to mention nail polish remover is easy to come by and useful for lots of stuff, so there’s not too much worry about how to get it off.
.
But for some reason, making your painted nails look good is nearly impossible! And if you’ve got it down perfect, you’re probably in the minority. What’s so hard about it? Well first, to paint your right nails you have to do it with your left hand (or vice versa if you’re left handed) so you have to learn to be a little ambidextrous. And it’s not like coloring . . . it’s more like painting!  But seriously, the more strokes you take, the worse it looks, just like if you’re painting a wall or a barn or whatever it is that tgirls might paint.
.
Don’t fret though, I have tips for you! First, buy decent nail polish. I know I say this all the time, but it’s really true – if you get the $1 bottle that’s been sitting in the discount bin for a couple years, it will be like painting with snot  And nailpolish is the most likely of all your makeups to go bad – if it starts getting tacky, get rid of it!
.
Next, store your nailpolish in the fridge – this limits the evaporation (keeps longer) and makes it spread/coat easier. Sort of like adding reversible paint thinner
.
Be aware that there are a couple different types of nail polish – some are thinner and runnier, some are thicker. The thicker stuff usually gives a brighter color in a single coat, but it’s also more difficult to avoid streaks. There is some really great runny nail polish out there that still gives saturated colors. But unfortunately no one labels nailpolish as to how runny it is – you just have to try a few. There’s also regular nailpolish and quickdry. Personally I don’t see much difference between them though, and any more most nail polish in the store is actually quick dry.
.
Ok, when you get your nail polish out to paint your nails, don’t shake it. What  Yes, you heard me, don’t shake it. Instead, roll it back and forth between your hands. You know, like your back in gradeschool making a clay snake. Do it fast because you want to mix it up, but the idea is to avoid introducing air bubbles which make a mess on your nails.
.
Now that you’re ready to apply your nail polish, pull the brush out running one of the flat sides along the edge of the bottle to wipe off pretty much all of the polish on that side. Then touch the paint coated side of the brush against the side of the bottle too so that you dab off about half of the drop of polish. That should be about the amount of nail polish you’ll want to do a single nail, though obviously it varies with the size of your nails, which nail you are painting, etc.
.
Start with a stroke down the very center of your nail, from cuticle to tip. Be careful lining things up when you put the brush down and pull it back up at the end of the stroke, but apply enough pressure that the bristles fan out a bit. One stroke only down the center! Then go back and take a single stroke down each side of the nail, slightly overlapping the center stroke. Then you’re done. Don’t touch it again  The only exception is if you have some rough edges at the tip of your nail, you can run the edge of the brush (not the tip!) over those to fill them in. If you’re not satisfied, forget about it for the moment, do the rest of your nails, let them dry (completely!), and add a second coat to fill in.
.
If you get a little sloppy with your nail polish, the most amazing thing to remove the excess is . . . a fingernail. Seriously, take the tip of another nail (preferably on the opposite hand, and one that hasn’t been painted yet if you have the option ) and scrape off the excess while it’s still wet. If you *really* make a mess, you can always put some nail polish remover on a tissue or makeup wipe and get it that way.
.
Speaking of nailpolish remover. I always go with the hardcore full acetone formula. Because my biggest concern is making sure that I get all of the polish off. I don’t use it often enough to justify needing a less harsh chemical (ie an acetone free version). Plain old non-frilly nailpolish remover is the most effective, and the cheapest. So I’d recommend that unless you have some special needs. And in a pinch, use paint thinner or household acetone.
Tags:
nail painting,
nail polish remover,
nailpolish —
Posted by: admin | Category:
makeup |
Comments (2)
February 14, 2009 / 7:52
So you’ve got the foundation, you’ve done your eyes, and now you just need to figure out what to do with your lips. No problem, this is the easiest step of them all! Soon you’ll be strutting down the street like a professional crossdresser  Or at least strutting around your bedroom with a pretty face.
.
Ok, down to business. Your lips need 3 things. Lipstick, and . . . and . . . At a loss for the other items? That’s what I was afraid of. If you’ve ever wondered why your lipstick always looks smudged or crooked, or why it looks rough or splotchy . . . it’s because you’re missing two very important steps!
.
First thing’s first, keep your lips moisturized. Buy chapstick and use it! Just your everyday Blistex or Vaseline lip stuff for everyday when you’re not crossdressing. If you have dry lips, the cracked skin will catch on your lipstick and peel off chunks of color, making your lips look rough and splotchy. You may also want gloss to put on over your lipstick depending on what kind you’re using – gloss is really just chapstick for girls, keeping your lips moisturized and making them shiny. Sometimes it has a little color too, but usually not much. Not suitable for your every day stuff, or you might get some strange looks.
.
Ok, the second item you need is lip liner. This looks like eyeliner (and really is the same stuff, just in different colors), and is a heavier makeup than your lipstick. It will do 2 things for you – help define your lips, and prevent your lipstick from smearing. “Normally” you would pick a lip liner that matches your lipstick color, but you can get some neat effects by pairing a lighter color (ie pink with red lipstick) or a darker color (ie maroon with red lipstick). Just experiment, as long as the colors compliment eachother.
.
Now you’re ready to actually put your makeup on. Start with the lip liner and outline your lips. Be really careful with this step as it’s easy to make things lopsided. You want to trace the edge of where your pinkish lip color fades into your regular skin color. Err to the inside unless you have really thin lips, and make sure you have a constant and smooth stroke width. The lines for your upper lip and lower lip should meet at the corners of your mouth, but should not really be connected. And your upper lip has a little “divot” in the middle, so make sure you trace down into that. If you don’t have a divot, or have a really small one, exaggerate a little.
.
Ok, now get out the lipstick and fill in your outline. You don’t want to put lipstick overtop the lip liner, so stay inside the lines! I keep the point of my lipstick up because I want a fine point to trace the edge of my thinner upper lip as the wider portion of the lipstick fills in below, and then on my lower lip I don’t need fine control along the bottom edge and it just feels more comfortable. Anyway, don’t fuss about filling everything in or getting right to the edge. Just put it on inside the lip liner outline, a little heavier than you think you need to.
.
Now squish your lips together (with your lip muscles, not your fingers!) and move your upper and lower lips against eachother both in and out and side to side. The idea here is to spread the lipstick around evenly, so don’t go to extremes and spread it off your lips, but you can be fairly aggressive about it. I don’t know why it works, but your lips seem to naturally stop against eachother just right to spread the lipstick everywhere. If you do get a little carried away, use your fingernail to scrape away lipstick in places where you don’t want it.
.
Ok, last step, add some gloss. And now you’ve got crossdresser lips the gg’s can drool over 
Tags:
lip liner,
lipgloss,
lipstick,
makeup —
Posted by: admin | Category:
makeup |
Comments (2)
January 28, 2009 / 1:08
Time to talk eye makeup. Eyes draw more attention than any other part of the face. Each of the six primary emotions can be expressed simply by the shape of the eyes. And there are more types of makeup for your eyes than any of your other features. So eyes are important! But don’t worry, they don’t have to be difficult either.
.
First thing’s first, start with the lightest color of the least precise makeup you’re going to apply. Probably eyeshadow. Now here’s where most of the trouble comes in – you don’t want to smear your entire eyelid with eyeshadow. I tend to think that crossdressers look better with a bright or bold eyeshadow which emphasizes that they are in fact wearing makeup (as opposed to going for that really subtle natural look), but please, you do not want to look like Mimi from The Drew Carey Show.
.
 There are 2 primary locations where you want eyeshadow: along the bottom edge of your eyelid, and along the top of your eyelid. You can use the same color in both locations, or you can do color on the bottom and brown or white on top, or two different colors . . . play around with it to get the effect you want. Notice, however, that for most cases there is no makeup above the eyelid (other than what bleeds over from the width of your brush when you follow the top edge of your lid), and there is no makeup below the eye. There are certain special effects that involve makeup in these areas, but unless you’re experimenting or are comfortable with what you’re doing, I would avoid it.
.
 Ok, so pick up some of the lightest color you plan to use and apply it in a smooth one-directional stroke. From the nose outward is easiest I think. Go ahead and follow the full path you want the eyeshadow to follow, but your brush will probably be running dry at the end of the stroke. Pick up some more eyeshadow on your brush and start from the center of your eye and make a stroke outwards to fill in from your last stroke. Grab some more eyeshadow and go back over everything again, blending the separate strokes together.
.
Now you can fill in the upper stroke or darker stroke, whichever it happens to be. You can blend the colors together in the center of your eyelid a bit, but it won’t matter too much if you don’t – you rarely ever see that part of a person’s eyelid anyway!
.
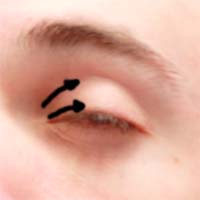
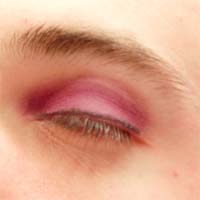
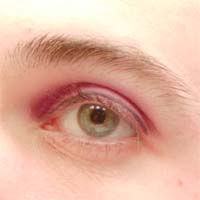
 Ok, now time for eyeliner, another tricky task. Eyeliner is (usually) really dark!! That means anywhere it goes, it’s going to show up. So all you have to do is make sure it only goes where you want it to . . . I know, easier said than done if you’ve ever tried before, but you’ll be surprised how easy it really is with this little trick . . . Stretch your eyelid out to the side (see the pic). The idea here is to make the bottom edge of your eyelid taught – pull out all the wrinkles, and keep it from moving under the drag of the eyeliner pencil. Also notice the beautiful two-tone eyeshadow that’s been applied in this photo
.
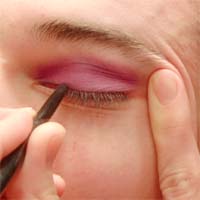 Ok, I know I said it’s easy, but you still have to be careful . . . apply your eyeliner S-L-O-W-L-Y, keep it as close to the edge of your lashes as you possibly can, and don’t worry about using a continuous stroke. It’s much more important to adjust your grip on your eyelid skin with your off hand to make sure it doesn’t start moving or bunching from the drag of the pencil. The eyeliner should be dark enough that you won’t even have to bother blending the different strokes together, so start and stop often, checking your progress as you go.
.
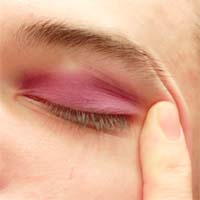
With a little luck, your eyes will look like the below pictures (eyes closed, and eyes open). It might take a few times, but don’t worry, you’ll get there.
.
.
Ok, last step is mascara. No pics of this, but I think you’ll figure it out. The trick with mascara is to brush from the base of the lashes outwards, and to twirl the brush as you move it. Rotating the brush makes sure that you get good contact between as many brush surfaces as possible with your lash. Make sure you keep the lashes as parallel as you can, and use 2 strokes, one for your inside lashes (near your nose) and one for your outside lashes. And don’t forget your bottom lashes! You probably don’t need to twirl the brush on the bottom lashes, a few short strokes should do nicely.
.
Some people say you should move the mascara brush back and forth as you take a stroke, but a) this is only necessary if you have a *really* crappy mascara brush, and b) it encourages clumping both of the mascara, and your lashes. Don’t let your lashes stick together when applying mascara (thus keeping them parallel). If you remember that, you’ll be fine.
.
And that’s it, now you should have gorgeous crossdresser eyes
Tags:
appy eyemakeup,
eyeliner,
eyeshadow,
mascara —
Posted by: admin | Category:
makeup |
Comments (0)
January 15, 2009 / 8:18
Everyone asks me how to do their makeup better, and I’m certainly no expert, but I’ll tell you what I’ve learned over a few years of doing it. And it all starts with foundation (or coverup, same thing).
.
I’m going to fly in the face of modern dermatology here, but you’re going to want a good thick cream foundation. Everyone these days uses powders or liquids or whipped foundation because they are lighter and let your natural skin color show . . . and they don’t clog your pores. But they also don’t cover up stubble. And I’m not talking about “I didn’t bother to shave this morning” stubble, most modern foundations won’t ever cover “I just shaved 5 min ago” stubble. Unless you are lucky enough to have really fine hair, in which case ignore everything I say.
.
Don’t fret too much if you need cream coverup, you probably don’t wear it often enough or long enough to worry about clogging your pores – remember most gg’s wear the stuff 12 hours a day every day! The only trick is finding the stuff (and in the right color). Look for makeup in a compact, not in a bottle or jar. And make sure it says “cream”. Neutrogena makes a pretty decent one if you need a place to start looking. Or you can try Ultima II which is available off of Amazon, but it’s a bit light on coverage for a cream.
.
Colors have semi-standardized names, so you can guess a little bit, but your best bet is to go into a store and compare the color sticker on the package to the skin on your wrist (palm side). You’ll probably want something just a tiny bit darker than your skin if you’re in between shades, otherwise get the closest match. If you’re guessing from the names, here’s a basic guide. “Ivory” is the lightest shade and has little color in it. “Natural”, “Amber”, or “Nude” are light skintones with some color in them (not color as in tan, but color as in more yellow than grey). “Buff” and “Beige” are usually medium tones but with a bit less yellow (leaning towards grey). “Golden” and “Honey” are medium tones with color. “Tan”, “Almond”, and “Cocoa” are exactly what they sound like. And of course there are combinations of the colors like “Natural Ivory”. And then sometimes the colors just make no sense. If you’re just looking at the colors on your computer screen though, err on the light side – most people guess a little too dark, and because your screen is backlit colors will look brighter than they are in real life.
.
Before you apply your new makeup, take a shower. Seriously. And wash your face, but don’t over-do it – you want to get any dead/dry skin off, but you don’t want to dry your face out and create new dead skin either. Stay in the shower for awhile with pleasantly warm water . . . makes a great time to shave your legs too. Now, if you want great makeup, apply a quick and thin coat of foundation while your face is still damp (not dripping, just damp). The moisture will keep the makeup spread out thin. Go cool off and dry yourself off, letting the foundation set up. Obviously don’t touch your face for a few min or stick it in a towel!
.
When you’ve got your foundation in hand and are ready to apply it (this goes for the base coat if you put one on, or your “topcoat”), use a sponge or cotton pad – lots of coverup will come with a sponge anyway, which is great. Cotton pads may leave fuzz if you have course hair. “Brush” in the direction of hair growth as a general rule, unless you find a little hair that you missed when shaving in which case go over it in the opposite direction first and then in the direction of growth. Spread the foundation out thin at first, you don’t want cakes of it, and you can always go back over and add more if you really need. Keep it off your eyebrows and hair, because that just looks funny. Feel free to go over your eyelids and lips though, as that will help keep your eyeshadow and lipstick in place when you apply them overtop the foundation. And don’t forget the little places, like the undersides of your eyes, and underneath your nose. Take the foundation all the way down your neck, but spread it out *really* thin towards the base of your neck – you want it to cover any stubble down your neck, but the color needs to fade out to your natural skin gradually. Don’t rub it in, just gentle strokes in one direction.
.
That’s it, all there is to it Ok, that plus a LOT of practice. But you’ll get the hang of it. And don’t worry, it may not look like much, but you’re well on your way to being one hot crossdresser
Tags:
coverup,
foundation,
makeup tips —
Posted by: admin | Category:
makeup |
Comments (1)
January 6, 2009 / 6:25
If you haven’t read my other breastform articles, you might want to check those out first for some cheaper breastform solutions. Or maybe you just came straight here because you have a huge wallet and don’t want to bother with the homemade stuff? That’s fine, but I’d still advise that you play around with some sort of homemade form (even just stuffing) to at least get an idea of what size and shape you’re looking for.
.
Ok, so you want to buy breastforms, hmm? Well the first thing to figure out is an appropriate size. Oh, and be aware that the larger the form you want, the more expensive. So not only are smaller forms usually MUCH more realistic, but they are also usually cheaper! If you’re not sure what size you want, go re-read the bra section on my clothes page. There is a really good summary there at the end of the section. But to re-cap, shoot for a B-cup breast to be “average”, and don’t forget that the size breast form you need to be B-cup changes based on your band size. I’m going to guess that most crossdressers will ignore my advice and go for a C-cup, and there’s nothing wrong with that. But I really do not recommend forms that are D-sized and larger unless you really just want huge tits and don’t care what anyone else says.
.
If you do go for large breast forms (D-cup or bigger), they will frequently be a bit saggy. After all the original intent of breast forms was to replace breasts that were removed from cancer patients, and most cancer patients are older and gravity is starting to take effect if they have large breasts. That means . . . you either need a REALLY good bra, which will likely squish the breastform and cause wrinkles in it. No permanent damage or anything, but it doesn’t really look pretty. Or your other option is to find breasts made specifically for crossdressers that are advertised as “perky” or “young” or something of the sort. Add some extra cash for this option usually. And just because they say perky doesn’t mean they will stay on your chest and not sag . . . you’re really going to have to glue these suckers on solid, and you’ll probably still need a strong bra to keep them from causing your SKIN to sag and thus the breast in turn will look less than perky.
.
Ok, enough on size, on to shape. Again, go re-read the bra section under clothes if you don’t remember what shapes are available. As a reminder though, here are some of the more common shapes:
Round
Triangular
Teardrop
Asymmetrical
.
Now what I didn’t mention before is that triangular forms are a little saggy too by their nature – one of the points of the triangle goes up, which means two of the points are on the lower edge of the form resulting in most of the breast mass being at the bottom of the form. Don’t worry though, that’s the way breast tissue really works. Teardrop forms can be worn in 2 different directions. If you have the point of the teardrop up, it may be a little saggy, but actually looks very realistic if you want to go bra-less. The other option is to wrap the point of the form around under your arm, which makes for a very perky breast. It’s somewhat unrealistic though because then the nipple points slightly outward away from the center of your body. I’m still a huge fan of the asymmetrical breastform – it creates a very realistic but perky breast. The little point goes up, creating the impression of weight (sort of like sag, but only enough to appear real), and the large point wraps under your arm, filling in that oh-so-important breast tissue that most people forget even exists.
.
One last note on shape . . . you’ve probably met girls who say they’ve got big C or D tits, and you look at them and wonder how they hide them so well. Or maybe you see a girl with amazing boobs who claims to “only” be a C-cup. That’s because (among other things, like how much underlying muscle, how firm the connective tissue, how dense the breast is, etc) there are two ways to fill the volume of a cup – projection (outwards from the body) and spread (think the “width” of the breast). Projection makes for breasts that look really good, have great cleavage, etc. But later in life these will also be the breasts that hang straight down. Spread makes the breast appear more uniform with the chest wall, and causes breasts to disappear when a girl lays on her back. When shopping for breast forms you’re not likely to have options about projection vs spread, though some stores will advertise that their forms have “great projection”. There does not seem to be a standard measurement for this, but in my experience most forms are made with a fairly standard ratio to fit the “average” person. If you DO have a choice, remember that you want a balance of projection and spread – spread is what will connect the form to your body and keep it in place. Projection will create the appearance you’re looking for.
.
Ok, so you know what size form you want, and you know what shape you want . . . now it’s on to materials! “But aren’t they just all made of silicone?” No! Silicone is the best known and most common material to be sure. And for good reason – it has great texture, weight, and elasticity, just like a real breast. It’s also uber-expensive, fragile, sensitive to chemicals, and the for large breasts it can break under its own weight. It’s worth a little more discussion though so you know the details if you’re looking into silicone forms.
.
Silicone . . . the most realistic form you can get. The density is about the same as fat (ie breast tissue), and the elastic properties are also amazingly similar – it “bounces”. The problem with this great density is that you are trying to attach the form to your skin, which is also amazingly stretchy, and the form has to be able to support it’s own weight. In a real breast everything is held inside a nicely resilliant package and attached to the rest of the body with some super connective tissue – it’s not going anywhere in the short term. So large silicone forms will sag the farther they project from the body, and the more total weight in the form the more they will cause your own skin to sag with them. Silicone comes in a lot of varieties . . . and breastforms are made of 2. The “filling” of the form is different from the “skin”. The filling has the right properties to simulate fat, but it doesn’t hold itself together very well. So a skin layer is added to hold the form together, much like a woman’s skin holds the breast tissue in. This skin layer, however, doesn’t feel very much like real skin, so manufacturers try to keep it as thin as possible. A thicker skin of course is more resistant to damage and can support more total weight in the form without sagging, but you sacrifice some of the realistic feel and bounce. The skin is also important because if it is punctured or ruptured, your form is ruined. And because the skin is made thin for the sake of realism, it’s easy to damage. So keep your forms away from sharp objects, and never sleep in silicone forms or lay directly on them! In addition, don’t use any products on or around your breast forms that aren’t specifically breast form safe. This means tapes and adhesives, as well as lotions, lubricants, cleaning products, etc. Mild soap (ie hand soap) is fine, but otherwise keep chemicals away!
.
Whipped silicone is a fairly new material used for breast forms. It has all the same properties of regular silicone except that there are tiny little air bubbles in it, so it’s more foamy than dense. It’s used for larger forms so they don’t sag, and so they are easier to wear (don’t weigh you down, cause back problems, etc). They also don’t feel quite the same, and don’t bounce quite the same. Of course, if you have DDD forms, you’ll probably be thankful of it. Don’t bother with whipped for “normal” sized forms though, as it will only ruin some of the realism.
.
Swim forms are a different material . . . I think they are a type of silicone, but not 100% sure. Anyway, they are sufficiently chemically resistant to go into chlorine water (don’t try this with your regular silicone forms) and are also lighter weight. Which means less realistic, but more comfortable for sports, etc. Unless you literally plan on going swimming though, you probably won’t be interested in swim forms.
.
Foam forms. These are great for creating the appearance of breasts without some of the disadvantages of silicone forms. They do not feel like breasts though, and they do not bounce. They are litterally made out of squishy foam like the egg-crate material you can buy for a matress pad, etc. Foam forms are less expensive and much more durable than silicone though – you can sleep in them, lay on them, pack them in suitcases, etc. As long as all you need is to LOOK like you have breasts, this is the way to go. If you want to FEEL like you have breasts (including the way they feel on you, not just the way they feel when you squeeze them) you will need to go with silicone. There is really no substitute. Foam is also more chemical resistant and should hold up to most stuff you might put on your body. Of course, even though they’re less expensive than silicone, there’s still not cheap. So I still wouldn’t recommend wearing too much lotion or lathering them up with baby oil or lube or anything.
.
Last topic is breastform adhesive. No, you do not NEED adhesive – using a bra can work just fine. You will need a full coverage bra if you’re not using adhesive, so that the top of your form doesn’t flop away from your chest, but you will probably want a full coverage bra anyway because breast forms never match your skin tone and will always look fake if they’re not covered (anyone know a trick that I don’t for blending a form to your chest?). Another option is a bra with a pocket designed for holding breastforms, and in this case you cannot use adhesive. If you want to go bra-less, or need some extra security (don’t have a good bra, or will be moving around a lot), you will want to look into breastform adhesive. Sometimes this is sold as medical adhesive, but not all medical adhesives are safe for silicone. Your best bet is to buy stuff specifically formulated to be safe for breastforms, but you can also look for a medical adhesive that says “safe for breastforms” or “silicone compatible”. Along with your adhesive, you will want adhesive remover, otherwise you will get a nasty dirty film on the back of your forms eventually where dirt and oil from your skin adhere to the tape. And speaking of tape . . . it is possible to use 3M double sided tape as an adhesive, but I’ve yet to figure out a good way to get it back off. Also rather painful to remove from your chest, but bearable (not sure how it compares to other adhesives). Anyway, it’s left a film on the back of my forms, so I stopped using it. But it never damaged the silicone at least. One other “must do” with adhesives . . . shave your chest! otherwise you will not be happy when it’s time to remove the forms.
.
To apply adhesive, just press it down around the edges of the form, trying to make as continuous of a line as you can, as close to the edge of the outline as you can get it. Holding down the edges of the form is the most important part, as this is the area you don’t want to flap up. And often the backs of breast forms are concave, so the center of the form may not even touch your chest anyway. It’s also helpful sometimes to line up the form on your chest BEFORE applying the adhesive, especially the first few times. The best way to do this is to get a bra that leaves the top of the form exposed (the kind I keep telling you not to try and use with forms, I know). Put the bra on and fit the forms in it, lining everything up the way you want them to sit on your chest. Then get some eyeliner or lipliner and gently trace the outline of the form, or a piece of the form, on your chest. Now when you put the adhesive on, you can just stick the form right to your chest lined up with the outline. Because breastform adhesive is STICKY, and if you don’t line it up right the first time, too bad – there is no slight adjusting after it’s on, you have to do it all over again. Also, it’s very easy to notice if someone’s breasts are lopsided, so be very careful that your two sides match. You’d be surprised at how little of a mismatch will make you look funny!
Tags:
applying breastforms,
breastform adhesive,
fake breasts,
silicone breastforms,
wearing breastforms —
Posted by: admin | Category:
breastforms |
Comments (5)
January 3, 2009 / 11:45
Ok, at this point I’m assuming you’ve read 3 things already, or at least have some prior knowledge of them . . . first is an overview of breast and bra sizes and shapes from my clothes section. Second is Breasts 101 which covers reasons for using breastform alternatives, and the basic method of stuffing, and third is Breasts 102 which covers sewing a basic re-usable breastform. If stuffing or a sewn breastform is working fine for you, don’t bother with this article. If you have money you can also skip this – no sense making an “acceptable” breastform with a lot of work if you can afford a fabulous pre-made one. If you’re still reading, the below sections will explain a couple methods for crafting your own breastforms at home.
.
This advanced home-made breastform is made of silicone, just like the real ones. Don’t expect it to look like the ones you can buy, or to feel quite as smooth and perfect, but this will definitely get you by for awhile in terms of look and feel through clothing. Though I don’t recommend squeezing it too much as it might leak . . .
.
Ok, so everyone’s heard of the water-bra, right? Well, this breastform works on the same principal. It’s basically a silicone shell filled with water, jello, or a special material described below. You could also fill it in with solid silicone, but this makes for a rather heavy form, and takes a lot of time too!
.
The first trick is to create a realistic breast mold. If you have a real live breast handy, this step is much easier, but if you don’t, you can probably hand-shape something reasonable. Pick out an appropriately-size Glad-Ware container, you’ll need one for each breast unless you’re making them one at a time . . . I used this one to make an almost-C-cup breast. Pour in some plaster of paris. You can get this stuff at any craft store, just mix it up with water. Now be careful here, as plaster of paris gets hot as it sets, enough to cause serious burns. But have your model smear a little Vaseline on her boobs, which keeps the plaster of paris from sticking, and have her lean over a table and press her breast into the Glad-Ware with the plaster of paris. You need the entire breast to fit into the Glad-Ware container without squishing in order to get a good shape. If your model complains of the heat, she should be able to pull out slowly and not ruin the mold, and the Vaseline will make sure the plaster of paris comes off and doesn’t burn her. If you don’t have a model, you will have to just let the plaster of paris start to set and then form it into an inverse breast when it’s just hard enough that it doesn’t flow back into the mold.
.
Let the mold set. Don’t start the next step until the plaster of paris is completely set.
.
Wash out the Vaseline. This is really important, as silicone won’t crosslink right if there’s too much Vaseline left in the mold, but DON’T wash out ALL of the Vaseline or the silicone will stick to the plaster of paris and you will never get it out. Use a warm soapy rag to clean out the mold. Submerging in water might soften the plaster (not to mention take off too much Vaseline), so I don’t recommend it. You don’t want the mold to be greasy, but the surface should be “soft” with Vaseline.
.
Ok, now get some clear silicone caulk from the hardware store. You’ll probably use an entire tube per breast, so get the full-sized tube and a caulk gun, it’s worth it. Start squirting caulk into your mold, creating a layer about 1/4 inch thick in the shape of the breast. This is going to be your shell. Don’t fill in the “interior” of the breast, as caulk won’t cross-link correctly if you get layers that are too thick. And note that this is only the outer surface of your shell at this point – the part that will rest against your chest is completely open.
.
At this point you have a couple options. If you want to fill the entire breast with silicone, wait for the “shell” to dry, and then add another 1/4 inch thick layer, and wait for that layer to dry. Repeat until the form is solid. You can see how much time and caulk this is going to take . . .
.
If you want to make a water-breast, ease the shell out of the mold and clean the surface that was against the plaster (after it sets!). Now lay down a 1/4 inch thick layer of caulk on a piece of wax paper, a little larger than the chest-side of your shell. Press the shell gently onto this flat layer, just enough to get a good seal around the edges. Let the bottom layer set, and then remove from the wax paper. You can trim the excess at this point. Make a little slit in the backing layer – this is where you will “inject” the water to fill your form. Place the entire shell back in a (clean) mold to hold it in shape. Get a turkey baster or something of the sort, and squirt water into the shell via the slit you made until the shell is full. Dry any water from the backing layer!!! Then apply a bead of caulk over the slit to seal it. Be aware that because water flows so easily, the water breast is more likely to spring a leak than other forms, and you have to be really careful to seal everything up! You could also fill this form with (liquid, unflavored) jello and let the jello set, but be aware it will soften a bit as you wear it, and has the potential to get a little gross over time.
.
If you want a slightly firmer breast that is less likely to leak, the following material works great:
.
Find yourself some borax (laundry isle of most supermarkets, sold as a laundry enhancer), and mix it up with water to make a saturated solution. That means add borax to water and mix it until you can’t mix anymore. If you see solids at the bottom afterwards, you’re done. If you don’t, add more borax and mix again. Pour off and save the solution, throw out the solids (don’t let this stuff sit, it will be impossible to get out of your mixing container if you do!). I’d start with a tablespoon in 1/4 cup of water, that should do for most breast forms unless you’re making a really big one
.
Next get yourself a giant container of Elmers glue (Elmers works best, I don’t know about generic white paper glues). You’ll want to make a 50:50 solution of Elmers and water. Try 1/4 cup Elmers with 1/4 cup water for most breast forms. Mix until you have a nice homogeneous solution.
.
If you used the quantities I recommended, now is the time to mix everything together. If you didn’t use the recommended amounts, mix the borax solution to glue solution in a 1:2 ratio. Mix and mix and mix. If you have a blender you don’t care about, that will help you along considerably. If there’s excess fluid that doesn’t mix into the “slime”, pour off the liquid. If it’s too thick and rubbery to mix, add water a LITTLE at a time. The end result should be a thick goup that pours slowly. Add some food coloring if you want to make it look flesh-toned (make it a LITTLE darker than you skin, because the clear silicone will diffuse some of the color). Red + Green will make “brown”, and the white of the borax will lighten this color.
.
Once you’ve got your filler solution, pour it into your silicone shell. You can “inject” it just like the water breast version above, or you can fill a shell with no chest wall. Because the borax solution is so thick, you can cover it with silicone caulk to create the chest wall after filling the form, which saves you from having to make a chest wall, making a slit, and then sealing the slit.
.
If all this seems like too much work . . . wait until the next update where I’ll discuss forms that can be purchased premade
Tags:
breastform filler,
homemade breast,
silicone breast,
water filled breastform —
Posted by: admin | Category:
breastforms |
Comments (2)
January 1, 2009 / 12:48
Ok, at this point I’m assuming you’ve read 2 things already, or at least have some prior knowledge of them . . . first is an overview of breast and bra sizes and shapes from my clothes page. Second is Breasts 101 which covers reasons for using breastform alternatives, and the basic method of stuffing. If stuffing is working fine for you, don’t bother with this article. If you have money you can also skip this – no sense making an “acceptable” breastform with a lot of work if you can afford a fabulous pre-made one. If you’re still reading, the below sections will explain a couple methods for crafting your own breastforms at home.
.
The most straightforward home breastform is basicaly permanent stuffing. The idea here is to sew (yes, you will need to be able to sew for this one) a decently shaped breast which you will then stuff like a stuffed animal or pillow. This way you only have to worry about matching the size and shape of each breast once – after that you just tuck and go. The downfalls of course are that fabric breasts are mostly air – they are lightweight and will not bounce, the are easy to flatten under a tight shirt, and they are not “squeezable”.
.
A sewn breastform can be made in any of the breastform shapes illustrated in the clothes section, though the easiest of course is the round form. Conveniently, the back of the form will be a flat outline of the form’s shape (to fit your chest), and the protruding portion of the form will be made of “triangles” of fabric that line the circumference of the backing and join at a point where the “nipple” will be. Below is a generic round breastform pattern. You might also try seaching the net for “knitted breast form” – I don’t know squat about knitting, but it seems to be a popular method.

Breastform Sewing Pattern
8 “triangles” is probably a good place to start, as they will be easy to space evenly around the round center. But experiment with different numbers – more triangles = more sewing! The diameter of the circle should be about 1/8 you chest circumference. For example, I wear a 34-36″ bra band, so the diameter of each breast would be between 34/8 = 4″ and 36/8 = 4.5″. To find the height of the traingles from circles edge to peak, use the formula:
h = sqrt( r^2 + cup^2 ) + 1/4″
where r is the radius of the circle (half the diameter), and cup is 1/2 for an A cup, 1 for a B cup, 1.5 for a C cup, etc. For example, to make a C cup breast for my 34″ band, the circle diameter would be 4″. That makes the radius 2″. The cup value for a C cup is 1.5″. So the triangle height would be sqrt( 2^2 + 1.5^2 ) + 1/4″ = sqrt( 4 + 2.25 ) + 1/4″ = 2.5 + 1/4″ = 2.75″
Also make sure you “plump out” the triangles by about 1/4″ – see the example pattern, the traingle’s edges are not straight, but bend outward.
.
Now sew the edges of neighboring triangles together, leaving a bit of room at the tips, by pinching the edges of the triangles together. Once all the edges are sewn, turn the form inside-out so it has a finished look. Now stuff the form with stuffing, making it as firm or soft as you like. Finish the job by stitching the tips of the triangles together to hold the stuffing in, and add a button as a nipple if you like.
.
You could also add a small (smooth!) rock or other weighted object near the base of the form before sewing it closed to give the form a bit more natural feel when you wear it, but this is just personal preference – it will have no impact on the visual effect of the breast.
Tags:
breasts,
cloth breastform,
knitted breastform,
sewn breastform —
Posted by: admin | Category:
breastforms |
Comments (0)
December 31, 2008 / 4:28
I know, I’ve seen all the beautiful silicone breastforms out there too. And I’ve seen the brazillian shemale porn models with their oversized perky tits bouncing up and down. And I’ve heard every girl I’ve ever met complain about how her boobs just aren’t big enough. So why wouldn’t you want to go out and buy the biggest, most expensive fake boobs that you can afford?
.
First, let’s just get this out of the way. Breastforms are EXPENSIVE! And they’re a terrible investment, they depreciate instantly (ie good luck with that return policy . . .) They are also fragile, and just like real breasts, they start to sag over time. Don’t get me wrong, I own 2 pair of silicone forms, and I wouldn’t trade them for the world. Just make sure you know what you’re getting into first.
.
Ok, second point, most CD’s buy the wrong size breasts. Just like 80% of women in the US buy the wrong size bra I suppose . . . Not to worry though, with the right information you too can buy the right size breasts I will skip over the information on what the sizes and shapes of breastforms mean in this article, as I’ve already discussed that in the clothes page. Why did it end up with clothes? I have no idea, but go to the “Bras / Panties / Breastforms” section if you need some basic info.
.
I think a good place to start with breasts is the simplest and cheapest method. We’ll work our way up to more complex stuff. The easiest way to make breasts for yourself, plain and simple, is by stuffing a bra with socks, tissues, etc. And yes, I’m serious. This doesn’t just apply to 13 year old girls in movies and TV shows about the pressures of being an adolescent. It might take a little practice, and you will have to settle for small breasts, and you will need an appropriate bra, but considering the economics, stuffing is a very good starting place.
.
Ok, small bra means A or B cup, and you should look for one with as much padding as you can find. Not only does the padding help fill you out a little, it also hides the inherent unevenness of your stuffing. If you’re a little larger and have a bit of breast tissue anyway, go with the B cup. If you have a flat chest you will get better results with the A cup. Don’t be discouraged. The key is to LOOK good, not to show off the size of your bra. They don’t really make “full coverage” bras in these small sizes, though that would be ideal. But definitely avoid anything like a demi bra or shelf bra – you want something with the largest/fullest cups you can find in the right size. If you need more info on bra types, head back to the clothing page.
.
Now that you’ve found yourself a bra, time to start stuffing. You will obviously have to be wearing the bra at this point, which means you will have to re-do your stuffing each time you dress. So find a method that works, and remember how many sheets of TP you used, or which pair of socks you used, etc. Also, since balled up socks or TP aren’t terrbily soft, you may want to put on a tight-fitting cami or t-shirt UNDER your bra. Or put a sports bra or another small-cup bra underneath.
.
I personally find that a pair of socks works the best for stuffing. In fact, I have a particular pair that I always use – they are ankle length, but are fairly fluffy and soft. I make 2 folds/rolls in each sock, rolling from the toe to the heel. At the heel, since the sock bends in a ~45deg angle, I make another 2 folds/rolls at a ~45deg angle to the original folds. This results in a more or less triangular shape, which I tuck neatly into my bra. Keeping the loose end against your skin will prevent the sock from unraveling during wear. And that’s all there is to it. For a little extra padding, you can always tuck cookies (again, see the clothing section for more info, scroll down a little when you get there) into the bra (between the sock and the bra), which like the padding of the bra itself, will help fill out out in the right areas and smooth out the outline of the sock. Take a look at the pics below for an example.

Folding Socks to Stuff your Bra
Tags:
bra padding,
breastforms,
breasts,
stuffing —
Posted by: admin | Category:
breastforms |
Comments (9)
December 31, 2008 / 1:13
Finally you’ve admitted that you are a crossdresser (at least to yourself), and you’re OK with that. If not, you should probably be reading my “why we dress” page. But assuming that you’re OK with it . . . what happens now? Well you’re not much of a crossdresser if you don’t have any clothes to wear, and you can’t keep “borrowing” your mom’s or your sister’s stuff forever! If you’re lucky enough to have a supportive girlfriend or wife who happens to be the same size as you, you might be able to borrow forever, but wouldn’t you still like to have your own stuff? Your own style? And then there’s always the possibility one of you will put on a little more weight than the other, or worse yet a breakup or divorce. Convinced having some clothes of your own is a good idea, but don’t know how to aquire them without embarassment? Then read on!
.
Ok, first thing’s first, you need to know what you’re looking for. If you’re not sure yet, or don’t know the difference between Juniors, Misses, and Womens clothing, check out the “clothing basics” page for more information on finding the right size and style.
.
Now that you have a basic idea of what you’re looking for, you have to pick a store (or stores). PLEASE save yourself the trouble and do NOT go to WalMart, Target, Meijers, etc looking for clothes unless you are looking for one of the following items: Playtex bras (Playtex “18 Hour” bras are wonderful full coverage bras, but don’t expect anything cute!), low quality (cheap) pantyhose, cute socks (Target only for socks in my experience), or makeup. I know, I know, everyone thinks that if they go to WalMart, fill their cart with mundane groceries, and toss in a random dress or pair of pantyhose, the cashier won’t notice. Not true! I have gotten just as many (if not more) strange looks doing this as when I walk up to a register at Forever 21 in the mall. Actually, it seems that the large pile of groceries just attracts extra attention to the out-of-place article of clothing. So don’t waste your time and money with mass merchandise clothing – it’s generally ends up being absolutely hideous, and you deserve better! And by the way, after many MANY strange looks at stores, I have never once had a cashier question me about my purchase or refuse a sale. So relax.
.
If you are looking for Juniors clothing, DO visit mall stores. Deb, Forever 21, Charlette Russe, Hot Topic (if you’re looking for goth), and even department stores (excluding Sears) offer amazing deals because Juniors fashion is trendy and thus goes out of style about every month. So walk in, make a bee-line for the back of the store, smile and nod at the irritating salesgirl, and find the clearance rack. Remember, the salesclerks usually either work on commission of some sort or don’t care about much about thier job, which means that if you’re browsing the clearance, you’re not worth their time no matter how out of place you look. Not to mention that if YOU fit into Juniors clothing, you can probably claim that you’re shopping for your girlfriend without anyone being suspicious. If you do shop in trendy mall stores though, you WILL have to deal with a teenage cashier. It’s not as bad as it sounds, but if that makes you terribly uncomfortable, don’t say I didn’t warn you. Personally, I think it’s worth it because there is no other type of store where I can pick up a cute shirt or skirt for under $5 almost every time I walk in.
.
If the teenage cashier scares you, department stores are still an option. Again, head to the back or edges of the department, that’s where the good clearance deals usually are. Department store employees usually also work on commission, and if you check out in the men’s department with an armfull of Juniors clothing, you will probably get funny looks. On the other hand, if you have items from a couple different departments and checkout at a register that is near an exit from the store, no one will think twice. Your best bet, since you usually will have a choice of cashiers at a department store, is to find a middle-aged female. Teenagers can be a bit intimidating and aren’t afraid to analyze your purchase, older employees are more likely to try and start a conversation (though they will likely think nothing of it, it can still make for an uncomfortable situation). Male sales associates are more likely to be judgemental than females. Just my experience.
.
If all of this still makes you too nervous, don’t worry! There is always internet shopping. If for some reason you don’t trust internet shopping, are worried about identity theft, etc, here is a little story for you. I have been shopping online regularly for about 10 years now, long before the internet was as secure as it is today. I have made purchases from some pretty shady vendors including porn sites with questionable content, Ebay sellers with poor ratings, etc. I typically spent more money in online purchases than I do in actual stores in a given year. In all this time, the only purchase security issue I have ever run into was at a physical store (DSW Shoes, if you want to know, apparently someone was dumpster diving for credit card reciepts). Not a single issue with online purchases. Ever.
.
Ok, that said, there are some items to be aware of with internet shopping. First of all, it is very difficult to select the right size for clothing, or color for makeup. And returns are a pain in the butt. Remember that free shipping deal you found? Well it isn’t free to return. So just make sure you’ve researched your purchase either online or in-store, know what you’re buying, and know your size. Maybe not very helpful for a very first purchase, but assuming you’ve actually tried on some female clothing at this point in your life, the internet can be a great friend. Still don’t know where to shop? Here are some online retailers that I have had great experiences with. And I have honestly bought things from each of these stores and been very happy. None of them are paying me to be listed here.
.
Sock Dreams.com – Sock Dreams is my favorite store ever because they specialize in my favorite article of clothing – socks! They are also CD friendly, and have amazing customer service. I’ve sent them several emails, and asked them permission to display their banner on my crossdressing site because I was so excited by my purchases from them. They also offer exceptionally detailed and useful reviews of their products, and lots of unique items you can’t find anywhere else.
.
Amazon.com – Yes, believe it or not, Amazon is great for everyday crossdressing items. They carry basic lingerie and intimate apparel (for example the Playtex 18 hour bra), though I wouldn’t depend on them for anything exotic. They also have a good selection of personal care items (for example Aveeno Positively Smooth Shave Reducing Lotion, or Aveeno Positively Smooth Shave Reducing Shaving Gel, or Nads XFol Follicle Release Scrub, etc). Often the prices are better than stores, and you can get hard-to-find items. The three I listed above I consider to be absolute essentials for shaving, but are nearly impossible to find in stores. Also, in spite of Amazon’s use of cookies to track your purchases, favorite items, etc . . . the company is far too large to bother looking at your individual information.
.
Snaz75.com – Snaz75 is definitely the best place to find great deals on sexy shoes and boots. Their clearance section is massive, the only drawback is the poor organization. Oh well, the prices and selection are fantastic. Shipping is discrete and timely, and I have ordered from them numerous times.
.
GlamourBoutique.com – GlamourBoutique’s site might not be much to look at, but they are tailored specificly to crossdressers, are friendly, and ship discretely. I’ve ordered from them once (and this was when they still just had an email form online and hand processed the orders!) and the entire process was lightning fast. They are serious about trying to make the purchase experience pleasant. I might not have bought from them if I just browsed to their site because it doesn’t look very professional, but they came highly recommended so I gave it a try. I suggest you do as well, as my purchase was WELL worth it.
.
HotLookz.com – HotLookz is an interesting site with some more exotic intimate items. I’ve only purchased from them once, but it was a very smooth transaction
.
XDress.com – XDress is a rather interesting site focused on selling panties and lingerie to men. They appear to cater to genderstraight individuals, but the panties and lingerie they carry are mostly very feminine with a handful of items that might come in handy if you’re a male stripper too. The best part about this site, however, is that they offer their items in clearly male sizes! And that’s enough to make any crossdresser happy The site is US-based, though I’ve not ordered from them yet. Let me know how it goes if you give them a try. Discover a diverse collection of underwear, like men’s panties at XDress.
Tags:
clothes,
shopping —
Posted by: admin | Category:
clothes |
Comments (7)