
April 28, 2012 / 12:58
I had completely forgotten that when YouTube shut down my channel, that no one would be able to watch my TGirl Makeup Instructional Video that I posted on here. Thanks to a comment from Becki who wanted to watch the video, I now have it re-posted directly on TheCrossdresser.org. You won’t be able to stream it any more, but you can download it and view it from your computer at your convenience 
.
7min 20sec runtime, 36MB download

.
This popular xdressing video details everything you need to know to achieve a beautiful and passable look with your makeup. Of course there are many different styles of makeup, so don’t be afraid to experiment! This video just covers the basics to get you started
Tags:
makeup,
shaving,
video —
Posted by: admin | Category:
makeup |
Comments (1)
May 31, 2009 / 7:25
Here is something I see WAY too much of – a beautiful tgirl who has totally botched a photo of herself by carelessly overusing Photoshop. I personally have no problem with using image editing to remove the occasional flaw, though frankly the flaw is often easier to take care of in real life with a little planning before the photo! Photoshop is an amazingly powerful tool, but while it is very capable of turning you into an airbrushed goddess, it is equally if not more capable of turning you into a corpse or cartoon. So a) use Photoshop correctly, and b) don’t overuse Photoshop.
.
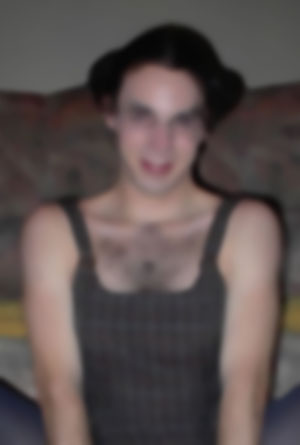
 Ok, Photoshop is a tough program to learn. So here’s a crash course on touching up a photo. I’ve selected a rather old photo of myself from before I started shaving – you know, back when crossdressing was just about feeling the clothes on my body . . . anyway . . . Here I am dolled up, my makeup done . . . but I’m still rather rough looking in the face, and DAMN am I hairy
.
I’ve purposefully selected a difficult photo to work with here – my first recommendation would be to shave or at least hide all that hair! But take a look at the arm hair which is much more manageable, and the roughness of my face. Those items are easy to fix in PS And while we’re at it, we’ll clean up the dingy colors and get rid of that harsh shadow behind me. How’s that for a start? You’ll notice I did select a photo where I’m happy with my facial expression, my eyes look fairly bright, and I have a nice clean smile. Fixing up those items if you need to will have to wait for another day.
.
 Ok first step. Open up your photo, crop it as you see fit, and create a duplicate layer of your image. We’re going to edit this layer and then hide it . . . and reveal it selectively in places that need help.
.
Now on the duplicate layer, apply a “remove dust and scratches” filter. You can also use a “median” filter, though I find dust and scratches works a bit better for hair and spots on the skin. Crank up the radius of the filter higher than you normally would – remember, we’re going to hide this version of the image anyway. You want it to completely take out all of the blemishes you can without totally losing the image.
.
Notice that doing this results in some ugly color edges, sort of like using a posterize filter. Don’t worry, we’ll take care of that in the next step. Also note that I’ve totally distorted the image, but that’s ok . . . obviously if you don’t have as many blemishes to deal with as I do here, it would be better to tone down the filter a bit. But even with this aggressive filter I still haven’t fixed all of my chest hair. We’ll get that later.
.
 Next step is to take care of the funky edges that the dust and scratches filter introduced. Apply a Gaussian blur to the image. Again, you’re going to want to crank up the radius on this filter higher than you normally would. The idea is to smooth out all the transitions and edges that the dust and scratches filter created. Don’t worry about the edges of your image, or the features on your face for that matter
  They will come back.
.
At this point you should have a relatively clean but dreadfully obscured photo of yourself. Remember, I’ve selected a particularly problematic photo as an example, so hopefully yours doesn’t look QUITE this bad. And don’t worry at this point, it only takes a little practice on these two steps before you start to get a feel for the settings to use. Save your time and effort for the next step 
.
Before we get into step 3, we need to hide all this blurring so we can see straight again. Create a layer mask attached to the duplicate layer and select “hide all”. This will make your entire duplicate layer disappear. So much for all your hard work so far, hmm? Don’t worry, this is where the magic of Photoshop comes in. We’re going to paint in the blurry image where we want to cover a blemish, and keep it hidden where we don’t need it.
.
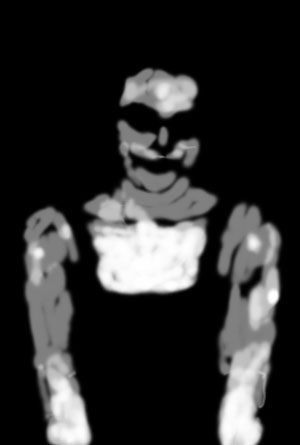 Oh here’s a strange image for you. This is my layer mask – you won’t see this image except in the thumbnail in your layers pallete, but I wanted to show you how I painted in the blurry image. The white spots are where the blurry duplicate image are revealed, and the black spots are where it’s completely invisible. You can see my brush strokes pretty clearly here, but these edges don’t really show up thanks to the fact that I’m just revealing a blurry version of the same image – they naturally blend into the underlying image so you don’t even have to worry about them
.
Ok, to create this mask grab the paintbrush and set your foreground color to white. You’ll want to set the opacity and flow to something around 50% each – this will let the duplicate image show up slowly over a series of strokes rather than right away at 100% wherever you click. If you have a pen tablet, now’s the time to break it out – it will make this step MUCH easier. In fact if you’re using a mouse, you might consider setting the opacity and flow to 20%.
.
Once you’ve got your brush set up, start painting on your skin only! I can’t think of anything other than skin that you’ll want to use this on, as it will completely obliterate textures. Speaking of which, some people recommend adding some random noise to the duplicate layer after all your blurring to match the capability of your camera (all cameras naturally introduce some noise, and if the background has more noise than your face something might look fishy). Personal taste though, I usually don’t add the noise back in. If you want to, try something around 1% though.
.
Don’t paint all of your skin! Remember how the blurry image lacked any definition and all your features disappeared? People have natural lines and edges. We’re 3D afterall. So don’t flatten yourself out. When you get to an edge or a corner or even a dimple that’s supposed to be there, leave it be! Don’t paint over your eyes or your lips, and only touch your nose right along the bridge. For the most obvious example of leaving an edge be, look at the area of this mask where my collar bones are – completely black.
.
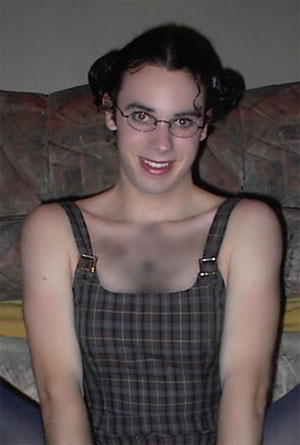 Here’s what your image should look like once you finish your mask. Much better already! Ok, my chest looks like crap still, but check out what the airbrushing did for my arm hair and face Generally speaking, if you have a difficult spot to get rid of, brush perpendicular to the spot (ie across the hairs, not with them). And if you have an edge you want to preserve, brush parallel to it (ie the strokes near my collarbone). A single spot can be taken care of by just tapping the pen or click-click-clicking the mouse a bunch of times – this will progressively make more of the blurry image fill in until the spot is gone.
.
Really take your time on the airbrushing part. Change your brush size for different areas, and be very careful when you come up against ridges or lines. Make sure you stop to think if that line should be there or not. You’ll notice that I erased some of the lines around my mouth, but I carefully left a few there as well – if I hadn’t, my face would look really funny. Another good idea is to never ever airbrush hands or feet – these body parts have such a complex surface that even a little airbrushing can completely ruin them. Also take care around any bones that stick out, like around your wrist – these are subtle gradients rather than lines, but they are important for defining your body and you don’t want to erase them.
.
 Time to take care of my ridiculous chest hair. We’ve already tried to blur it away without success, so let’s unselect the layermask and work directly on the blurry image (remember, this image should be almost completely visible in the chest area since we were trying to blur away my chest hair). Instead we are going to dodge it away, so grab the dodge tool and do something you never do with dodge. Set it to dodge shadows. Normally you want to dodge highlights to brighten them, or burn shadows to darken them. In this case I actually want to erase “shadows” by brightening them. Again, set your opacity low to begin with so the dodge occurs gradually.
.
After dodging away at the chest hairs you will eventually get to a nice even tone across the chest, but it will probably be pretty gray-ish. A quick remedy is to select a nearby skintone, add a new (blank) layer on top of the duplicated layer with a blending mode of overlay, and paint in a little color. You’ll want to set the opacity on your brush very very low for this, but just use the paintbrush to color in a little skintone. With a little luck the overlay blend mode will retain the shading of the chest so it still has some shape while adding in some color from the new layer.
.
 Ok, time for a relatively easy step. Flatten your layers from the previous work once you’re satisfied with them. Now it’s time to work on the composite image as a whole. Alternately you could do this step first on the original image, but I always forget The original image here was a bit dark, and the shadows were very sharp. Often if you Auto Tone, Auto Contrast, Auto Color the image (in that order), Photoshop will do a rather nice job for you and you’re done.
.
In this case my image needed a little extra loving attention, so I went into Image->Adjustments->Levels command. I brought the white slider down a good bit to increase the number of white pixels in the image. Then I bumped the black slider up slightly to make sure the shadows in my photo were actually black. And I shifted the medium gray slider (aka the gamma) to lighten the image a bit – this slider reduces the total contrast in the image if you move it from 1.0, so be careful with it. Overall not bad though, hmm?
.
 Ok, the last step! Let’s soften that terrible shadow behind me. Hopefully the shadow won’t be as bad in your images, because I didn’t manage to get rid of the whole thing. But the steps are pretty easy. Grab the Quick Selection Wand and select yourself. Ok, that step might take a few minutes of playing around, but it shouldn’t be too difficult to get a decent selection. Now open the Select->Refine dialog box and feather the selection just a bit. You’ll also want to contract it so that the shadow is definitely outside of the selection. Now copy yourself onto a new layer.
.
Open the blending settings dialog for your new layer, and give it a drop shadow. I know, I already have too much of a drop shadow, but trust me! Now set the shadow color to white and the blending mode to screen, and set the light direction to be opposite of the current shadow – this will cast a white shadow on top of your existing shadow  Play around with the size until you get it right. You can also add an inner glow to clean up any shadowy parts that were inside your selection.
.
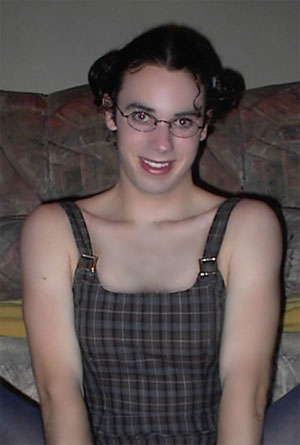
And that’s it! Now you have a properly airbrushed and fixed up image, no matter how bad it looked like to begin with
Tags:
airbrush,
fixing photos,
glamor photo,
image editing,
Photoshop,
remove chest hair —
Posted by: admin | Category:
makeup,
photos |
Comments (0)
May 16, 2009 / 10:19
 Here’s a great new eye makeup style that I learned about which creates a very subtle and innocent look. I tried it out for the first time today, and I’m pretty happy with the results There are two major lessons here that I will probably apply to other styles as well. First is applying a horizontal gradient across the eyelid . . . previously I had always used a vertical gradient (ie from lashes up to eyebrow) because it seems “natural”, but it turns out that a horizontal gradient (ie from nose outwards) does a great job of softening shadows that fall on your face – perfect for that “innocent” look, and also great for generally making you look younger. Second is using a similar technique for eyeliner on the bottom lid. I’d always had a hard time with eyeliner looking too dark on my lower lid, but if I didn’t add any at all then my eye lacked definition. Believe it or not, creating a horizontal gradient with your eyeliner is also a great makeup trick!
.
Step 1:
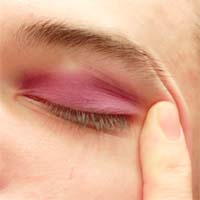
 Ok, first step is to apply a base layer of the lightest color you will be using. Always start light and layer on darker colors, regardless of which direction your gradient goes. If you do it the other way around, you will have a hard time with smudges and streaks. To get a nice innocent look, I started with a base layer of white eyeshadow and filled my entire upper lid from lash to brow. I also added a streak of white on my lower lid. Be careful adding light colors on your lower lid though, because whites and silvers have a tendency to accentuate wrinkles (and most people have some wrinkles under their eyes even when they are relatively young). If you can’t pull off white or silver, try a brown that’s lighter than your skin tone.
.
Step 2:
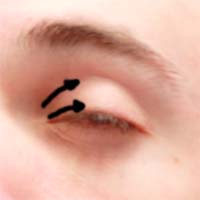
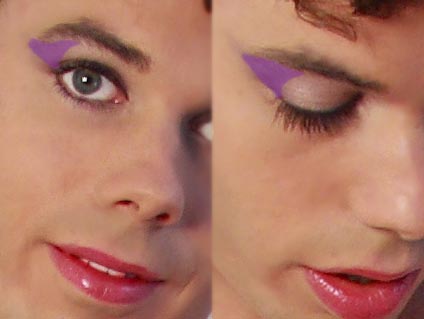 Next step is to add the gradient. Select a darker color (purples or blues work great for this) and “dab” it into your eyelid on the outer edge. This keeps the lighter color towards your nose where shadows tend to form, thus counteracting the shadows and softening your face. Anyway, dab away, but don’t blend or smudge – you’ll end up with way too much color and the darker shade will just go everywhere. Dab dab dab. You don’t need much eyeshadow for this. Also follow the line of your eye *up* your cheek a bit – this will elongate your eye a bit, but make sure you go up your face so you don’t make your eyes look droopy!
.
Step 3:
 I’m going to break my own advice here on step 3, and I don’t have a good justification for it. Just trust me :p Ok, grab your black eyeliner (or black eyeshadow with a thin tight brush) and trace your upper lash line like you normally would. You want a nice thin line because most of your eyelid is a very light color that you don’t want to overwhelm. Work from the inside edge outwards, and be sure to pull your skin taught. to keep the line crisp. Now on to your bottom lid, start from the *outside* edge and work your way about 3/4 the way across your eye. No further, just 3/4 the way across!
.
Step 4:
 Ok, now grab a bright white eyeshadow, preferably brighter than what you coated your eye with. Using a small tight brush, start from the inside edge of your lower eyelid and pull a single thin line of white out towards where you stopped with the black eyeliner. You’ll want to go about halfway across your eye (overlapping the black), but allow the white to fade out into the black eyeliner where they overlap. This should create a nice gradient that brightens up the lower inside corner of your eye. It will make you look more awake and perky
.
That’s all there is to it! Now you have perfect eyes for a schoolgirl outfit, wedding, or any other innocent look.
Tags:
eye makeup,
eyeliner,
eyeshadow,
gradient,
innocent,
schoolgirl,
wedding,
white eyeshadow —
Posted by: admin | Category:
makeup |
Comments (0)
April 12, 2009 / 7:33
Edit 4/28/12: YouTube shut down my channel But the good news is that I just reposted the video today – check out my updated post.
.
Just uploaded, check out my new YouTube video: Makeup for Crossdressers. This instructional video goes through the how-to steps of tgirl makeup from shaving through finishing touches in high def detail. I know I’ve posted before on individual makeup tips, but I thought this video might be really helpful for any visual learners out there
.
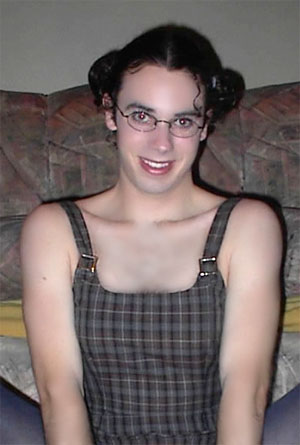
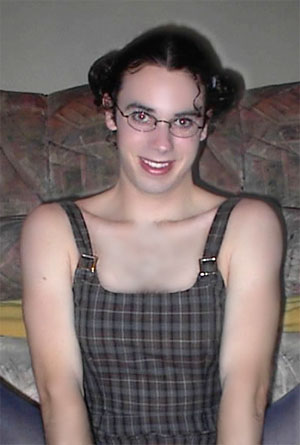
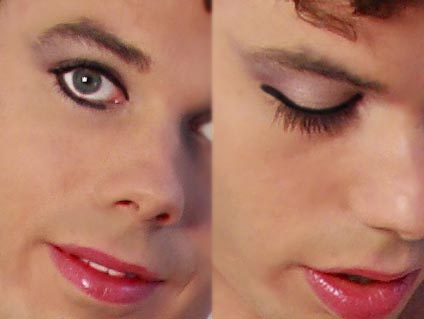
If nothing else, it’s worth taking a look at the before and after photo below to see what a difference some well-applied makeup can make. And let me tell you, I’m not a professional makeup artist, this is stuff that anyone can do at home!
.

Crossdresser Makeup Before and After
Tags:
before and after,
eyeshadow,
how-to,
lipstick,
makeup,
video —
Posted by: admin | Category:
makeup |
Comments (1)
February 28, 2009 / 6:40
For many tgirls, nail polish is one of their first forays into the mysterious world of makeup. Painted toenails can remain hidden under socks and shoes, so it’s safe. And I’ve known a lot of genetic girls who have a fascination with painting guys nails . . . so you can always claim your girlfriend did it to you! Not to mention nail polish remover is easy to come by and useful for lots of stuff, so there’s not too much worry about how to get it off.
.
But for some reason, making your painted nails look good is nearly impossible! And if you’ve got it down perfect, you’re probably in the minority. What’s so hard about it? Well first, to paint your right nails you have to do it with your left hand (or vice versa if you’re left handed) so you have to learn to be a little ambidextrous. And it’s not like coloring . . . it’s more like painting!  But seriously, the more strokes you take, the worse it looks, just like if you’re painting a wall or a barn or whatever it is that tgirls might paint.
.
Don’t fret though, I have tips for you! First, buy decent nail polish. I know I say this all the time, but it’s really true – if you get the $1 bottle that’s been sitting in the discount bin for a couple years, it will be like painting with snot  And nailpolish is the most likely of all your makeups to go bad – if it starts getting tacky, get rid of it!
.
Next, store your nailpolish in the fridge – this limits the evaporation (keeps longer) and makes it spread/coat easier. Sort of like adding reversible paint thinner 
.
Be aware that there are a couple different types of nail polish – some are thinner and runnier, some are thicker. The thicker stuff usually gives a brighter color in a single coat, but it’s also more difficult to avoid streaks. There is some really great runny nail polish out there that still gives saturated colors. But unfortunately no one labels nailpolish as to how runny it is – you just have to try a few. There’s also regular nailpolish and quickdry. Personally I don’t see much difference between them though, and any more most nail polish in the store is actually quick dry.
.
Ok, when you get your nail polish out to paint your nails, don’t shake it. What  Yes, you heard me, don’t shake it. Instead, roll it back and forth between your hands. You know, like your back in gradeschool making a clay snake. Do it fast because you want to mix it up, but the idea is to avoid introducing air bubbles which make a mess on your nails.
.
Now that you’re ready to apply your nail polish, pull the brush out running one of the flat sides along the edge of the bottle to wipe off pretty much all of the polish on that side. Then touch the paint coated side of the brush against the side of the bottle too so that you dab off about half of the drop of polish. That should be about the amount of nail polish you’ll want to do a single nail, though obviously it varies with the size of your nails, which nail you are painting, etc.
.
Start with a stroke down the very center of your nail, from cuticle to tip. Be careful lining things up when you put the brush down and pull it back up at the end of the stroke, but apply enough pressure that the bristles fan out a bit. One stroke only down the center! Then go back and take a single stroke down each side of the nail, slightly overlapping the center stroke. Then you’re done. Don’t touch it again  The only exception is if you have some rough edges at the tip of your nail, you can run the edge of the brush (not the tip!) over those to fill them in. If you’re not satisfied, forget about it for the moment, do the rest of your nails, let them dry (completely!), and add a second coat to fill in.
.
If you get a little sloppy with your nail polish, the most amazing thing to remove the excess is . . . a fingernail. Seriously, take the tip of another nail (preferably on the opposite hand, and one that hasn’t been painted yet if you have the option ) and scrape off the excess while it’s still wet. If you *really* make a mess, you can always put some nail polish remover on a tissue or makeup wipe and get it that way.
.
Speaking of nailpolish remover. I always go with the hardcore full acetone formula. Because my biggest concern is making sure that I get all of the polish off. I don’t use it often enough to justify needing a less harsh chemical (ie an acetone free version). Plain old non-frilly nailpolish remover is the most effective, and the cheapest. So I’d recommend that unless you have some special needs. And in a pinch, use paint thinner or household acetone.
Tags:
nail painting,
nail polish remover,
nailpolish —
Posted by: admin | Category:
makeup |
Comments (2)
February 14, 2009 / 7:52
So you’ve got the foundation, you’ve done your eyes, and now you just need to figure out what to do with your lips. No problem, this is the easiest step of them all! Soon you’ll be strutting down the street like a professional crossdresser  Or at least strutting around your bedroom with a pretty face.
.
Ok, down to business. Your lips need 3 things. Lipstick, and . . . and . . . At a loss for the other items? That’s what I was afraid of. If you’ve ever wondered why your lipstick always looks smudged or crooked, or why it looks rough or splotchy . . . it’s because you’re missing two very important steps!
.
First thing’s first, keep your lips moisturized. Buy chapstick and use it! Just your everyday Blistex or Vaseline lip stuff for everyday when you’re not crossdressing. If you have dry lips, the cracked skin will catch on your lipstick and peel off chunks of color, making your lips look rough and splotchy. You may also want gloss to put on over your lipstick depending on what kind you’re using – gloss is really just chapstick for girls, keeping your lips moisturized and making them shiny. Sometimes it has a little color too, but usually not much. Not suitable for your every day stuff, or you might get some strange looks.
.
Ok, the second item you need is lip liner. This looks like eyeliner (and really is the same stuff, just in different colors), and is a heavier makeup than your lipstick. It will do 2 things for you – help define your lips, and prevent your lipstick from smearing. “Normally” you would pick a lip liner that matches your lipstick color, but you can get some neat effects by pairing a lighter color (ie pink with red lipstick) or a darker color (ie maroon with red lipstick). Just experiment, as long as the colors compliment eachother.
.
Now you’re ready to actually put your makeup on. Start with the lip liner and outline your lips. Be really careful with this step as it’s easy to make things lopsided. You want to trace the edge of where your pinkish lip color fades into your regular skin color. Err to the inside unless you have really thin lips, and make sure you have a constant and smooth stroke width. The lines for your upper lip and lower lip should meet at the corners of your mouth, but should not really be connected. And your upper lip has a little “divot” in the middle, so make sure you trace down into that. If you don’t have a divot, or have a really small one, exaggerate a little.
.
Ok, now get out the lipstick and fill in your outline. You don’t want to put lipstick overtop the lip liner, so stay inside the lines! I keep the point of my lipstick up because I want a fine point to trace the edge of my thinner upper lip as the wider portion of the lipstick fills in below, and then on my lower lip I don’t need fine control along the bottom edge and it just feels more comfortable. Anyway, don’t fuss about filling everything in or getting right to the edge. Just put it on inside the lip liner outline, a little heavier than you think you need to.
.
Now squish your lips together (with your lip muscles, not your fingers!) and move your upper and lower lips against eachother both in and out and side to side. The idea here is to spread the lipstick around evenly, so don’t go to extremes and spread it off your lips, but you can be fairly aggressive about it. I don’t know why it works, but your lips seem to naturally stop against eachother just right to spread the lipstick everywhere. If you do get a little carried away, use your fingernail to scrape away lipstick in places where you don’t want it.
.
Ok, last step, add some gloss. And now you’ve got crossdresser lips the gg’s can drool over 
Tags:
lip liner,
lipgloss,
lipstick,
makeup —
Posted by: admin | Category:
makeup |
Comments (2)
January 28, 2009 / 1:08
Time to talk eye makeup. Eyes draw more attention than any other part of the face. Each of the six primary emotions can be expressed simply by the shape of the eyes. And there are more types of makeup for your eyes than any of your other features. So eyes are important! But don’t worry, they don’t have to be difficult either.
.
First thing’s first, start with the lightest color of the least precise makeup you’re going to apply. Probably eyeshadow. Now here’s where most of the trouble comes in – you don’t want to smear your entire eyelid with eyeshadow. I tend to think that crossdressers look better with a bright or bold eyeshadow which emphasizes that they are in fact wearing makeup (as opposed to going for that really subtle natural look), but please, you do not want to look like Mimi from The Drew Carey Show.
.
 There are 2 primary locations where you want eyeshadow: along the bottom edge of your eyelid, and along the top of your eyelid. You can use the same color in both locations, or you can do color on the bottom and brown or white on top, or two different colors . . . play around with it to get the effect you want. Notice, however, that for most cases there is no makeup above the eyelid (other than what bleeds over from the width of your brush when you follow the top edge of your lid), and there is no makeup below the eye. There are certain special effects that involve makeup in these areas, but unless you’re experimenting or are comfortable with what you’re doing, I would avoid it.
.
 Ok, so pick up some of the lightest color you plan to use and apply it in a smooth one-directional stroke. From the nose outward is easiest I think. Go ahead and follow the full path you want the eyeshadow to follow, but your brush will probably be running dry at the end of the stroke. Pick up some more eyeshadow on your brush and start from the center of your eye and make a stroke outwards to fill in from your last stroke. Grab some more eyeshadow and go back over everything again, blending the separate strokes together.
.
Now you can fill in the upper stroke or darker stroke, whichever it happens to be. You can blend the colors together in the center of your eyelid a bit, but it won’t matter too much if you don’t – you rarely ever see that part of a person’s eyelid anyway!
.
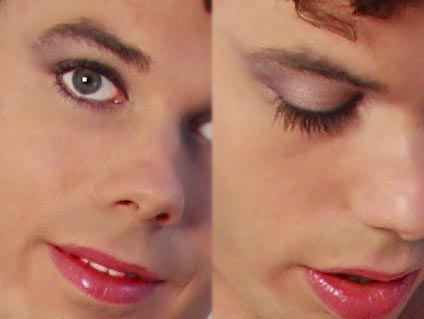
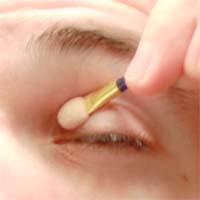
 Ok, now time for eyeliner, another tricky task. Eyeliner is (usually) really dark!! That means anywhere it goes, it’s going to show up. So all you have to do is make sure it only goes where you want it to . . . I know, easier said than done if you’ve ever tried before, but you’ll be surprised how easy it really is with this little trick . . . Stretch your eyelid out to the side (see the pic). The idea here is to make the bottom edge of your eyelid taught – pull out all the wrinkles, and keep it from moving under the drag of the eyeliner pencil. Also notice the beautiful two-tone eyeshadow that’s been applied in this photo
.
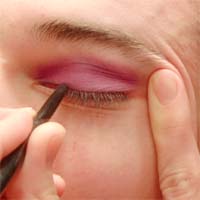 Ok, I know I said it’s easy, but you still have to be careful . . . apply your eyeliner S-L-O-W-L-Y, keep it as close to the edge of your lashes as you possibly can, and don’t worry about using a continuous stroke. It’s much more important to adjust your grip on your eyelid skin with your off hand to make sure it doesn’t start moving or bunching from the drag of the pencil. The eyeliner should be dark enough that you won’t even have to bother blending the different strokes together, so start and stop often, checking your progress as you go.
.
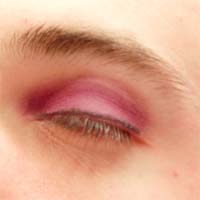
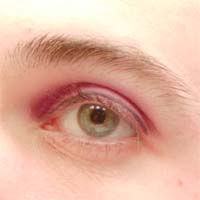
With a little luck, your eyes will look like the below pictures (eyes closed, and eyes open). It might take a few times, but don’t worry, you’ll get there.
.
.
Ok, last step is mascara. No pics of this, but I think you’ll figure it out. The trick with mascara is to brush from the base of the lashes outwards, and to twirl the brush as you move it. Rotating the brush makes sure that you get good contact between as many brush surfaces as possible with your lash. Make sure you keep the lashes as parallel as you can, and use 2 strokes, one for your inside lashes (near your nose) and one for your outside lashes. And don’t forget your bottom lashes! You probably don’t need to twirl the brush on the bottom lashes, a few short strokes should do nicely.
.
Some people say you should move the mascara brush back and forth as you take a stroke, but a) this is only necessary if you have a *really* crappy mascara brush, and b) it encourages clumping both of the mascara, and your lashes. Don’t let your lashes stick together when applying mascara (thus keeping them parallel). If you remember that, you’ll be fine.
.
And that’s it, now you should have gorgeous crossdresser eyes
Tags:
appy eyemakeup,
eyeliner,
eyeshadow,
mascara —
Posted by: admin | Category:
makeup |
Comments (0)
January 15, 2009 / 8:18
Everyone asks me how to do their makeup better, and I’m certainly no expert, but I’ll tell you what I’ve learned over a few years of doing it. And it all starts with foundation (or coverup, same thing).
.
I’m going to fly in the face of modern dermatology here, but you’re going to want a good thick cream foundation. Everyone these days uses powders or liquids or whipped foundation because they are lighter and let your natural skin color show . . . and they don’t clog your pores. But they also don’t cover up stubble. And I’m not talking about “I didn’t bother to shave this morning” stubble, most modern foundations won’t ever cover “I just shaved 5 min ago” stubble. Unless you are lucky enough to have really fine hair, in which case ignore everything I say.
.
Don’t fret too much if you need cream coverup, you probably don’t wear it often enough or long enough to worry about clogging your pores – remember most gg’s wear the stuff 12 hours a day every day! The only trick is finding the stuff (and in the right color). Look for makeup in a compact, not in a bottle or jar. And make sure it says “cream”. Neutrogena makes a pretty decent one if you need a place to start looking. Or you can try Ultima II which is available off of Amazon, but it’s a bit light on coverage for a cream.
.
Colors have semi-standardized names, so you can guess a little bit, but your best bet is to go into a store and compare the color sticker on the package to the skin on your wrist (palm side). You’ll probably want something just a tiny bit darker than your skin if you’re in between shades, otherwise get the closest match. If you’re guessing from the names, here’s a basic guide. “Ivory” is the lightest shade and has little color in it. “Natural”, “Amber”, or “Nude” are light skintones with some color in them (not color as in tan, but color as in more yellow than grey). “Buff” and “Beige” are usually medium tones but with a bit less yellow (leaning towards grey). “Golden” and “Honey” are medium tones with color. “Tan”, “Almond”, and “Cocoa” are exactly what they sound like. And of course there are combinations of the colors like “Natural Ivory”. And then sometimes the colors just make no sense. If you’re just looking at the colors on your computer screen though, err on the light side – most people guess a little too dark, and because your screen is backlit colors will look brighter than they are in real life.
.
Before you apply your new makeup, take a shower. Seriously. And wash your face, but don’t over-do it – you want to get any dead/dry skin off, but you don’t want to dry your face out and create new dead skin either. Stay in the shower for awhile with pleasantly warm water . . . makes a great time to shave your legs too. Now, if you want great makeup, apply a quick and thin coat of foundation while your face is still damp (not dripping, just damp). The moisture will keep the makeup spread out thin. Go cool off and dry yourself off, letting the foundation set up. Obviously don’t touch your face for a few min or stick it in a towel!
.
When you’ve got your foundation in hand and are ready to apply it (this goes for the base coat if you put one on, or your “topcoat”), use a sponge or cotton pad – lots of coverup will come with a sponge anyway, which is great. Cotton pads may leave fuzz if you have course hair. “Brush” in the direction of hair growth as a general rule, unless you find a little hair that you missed when shaving in which case go over it in the opposite direction first and then in the direction of growth. Spread the foundation out thin at first, you don’t want cakes of it, and you can always go back over and add more if you really need. Keep it off your eyebrows and hair, because that just looks funny. Feel free to go over your eyelids and lips though, as that will help keep your eyeshadow and lipstick in place when you apply them overtop the foundation. And don’t forget the little places, like the undersides of your eyes, and underneath your nose. Take the foundation all the way down your neck, but spread it out *really* thin towards the base of your neck – you want it to cover any stubble down your neck, but the color needs to fade out to your natural skin gradually. Don’t rub it in, just gentle strokes in one direction.
.
That’s it, all there is to it Ok, that plus a LOT of practice. But you’ll get the hang of it. And don’t worry, it may not look like much, but you’re well on your way to being one hot crossdresser
Tags:
coverup,
foundation,
makeup tips —
Posted by: admin | Category:
makeup |
Comments (1)