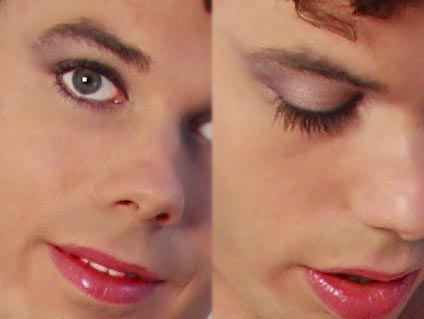
 Here’s a great new eye makeup style that I learned about which creates a very subtle and innocent look. I tried it out for the first time today, and I’m pretty happy with the results
  Ok, first step is to apply a base layer of the lightest color you will be using. Always start light and layer on darker colors, regardless of which direction your gradient goes. If you do it the other way around, you will have a hard time with smudges and streaks. To get a nice innocent look, I started with a base layer of white eyeshadow and filled my entire upper lid from lash to brow. I also added a streak of white on my lower lid. Be careful adding light colors on your lower lid though, because whites and silvers have a tendency to accentuate wrinkles (and most people have some wrinkles under their eyes even when they are relatively young). If you can’t pull off white or silver, try a brown that’s lighter than your skin tone.
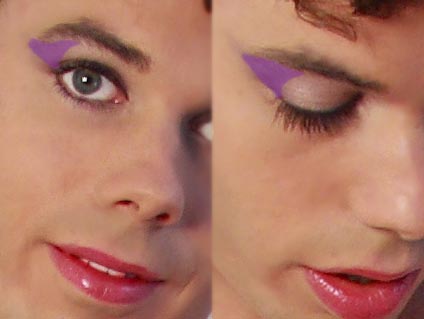 Next step is to add the gradient. Select a darker color (purples or blues work great for this) and “dab” it into your eyelid on the outer edge. This keeps the lighter color towards your nose where shadows tend to form, thus counteracting the shadows and softening your face. Anyway, dab away, but don’t blend or smudge – you’ll end up with way too much color and the darker shade will just go everywhere. Dab dab dab. You don’t need much eyeshadow for this. Also follow the line of your eye *up* your cheek a bit – this will elongate your eye a bit, but make sure you go up your face so you don’t make your eyes look droopy!
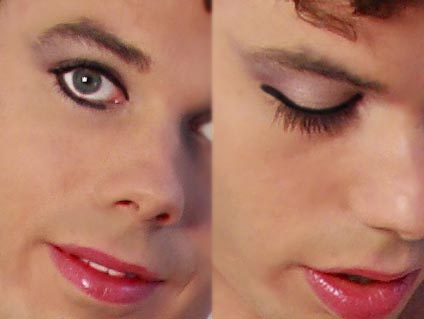 I’m going to break my own advice here on step 3, and I don’t have a good justification for it. Just trust me :p Ok, grab your black eyeliner (or black eyeshadow with a thin tight brush) and trace your upper lash line like you normally would. You want a nice thin line because most of your eyelid is a very light color that you don’t want to overwhelm. Work from the inside edge outwards, and be sure to pull your skin taught. to keep the line crisp. Now on to your bottom lid, start from the *outside* edge and work your way about 3/4 the way across your eye. No further, just 3/4 the way across!
 Ok, now grab a bright white eyeshadow, preferably brighter than what you coated your eye with. Using a small tight brush, start from the inside edge of your lower eyelid and pull a single thin line of white out towards where you stopped with the black eyeliner. You’ll want to go about halfway across your eye (overlapping the black), but allow the white to fade out into the black eyeliner where they overlap. This should create a nice gradient that brightens up the lower inside corner of your eye. It will make you look more awake and perky
 Time to talk eye makeup. Eyes draw more attention than any other part of the face. Each of the six primary emotions can be expressed simply by the shape of the eyes. And there are more types of makeup for your eyes than any of your other features. So eyes are important! But don’t worry, they don’t have to be difficult either.
.
First thing’s first, start with the lightest color of the least precise makeup you’re going to apply. Probably eyeshadow. Now here’s where most of the trouble comes in – you don’t want to smear your entire eyelid with eyeshadow. I tend to think that crossdressers look better with a bright or bold eyeshadow which emphasizes that they are in fact wearing makeup (as opposed to going for that really subtle natural look), but please, you do not want to look like Mimi from The Drew Carey Show.
.
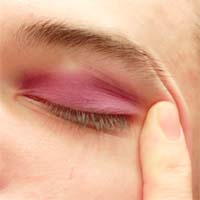
 There are 2 primary locations where you want eyeshadow: along the bottom edge of your eyelid, and along the top of your eyelid. You can use the same color in both locations, or you can do color on the bottom and brown or white on top, or two different colors . . . play around with it to get the effect you want. Notice, however, that for most cases there is no makeup above the eyelid (other than what bleeds over from the width of your brush when you follow the top edge of your lid), and there is no makeup below the eye. There are certain special effects that involve makeup in these areas, but unless you’re experimenting or are comfortable with what you’re doing, I would avoid it.
.
 Ok, so pick up some of the lightest color you plan to use and apply it in a smooth one-directional stroke. From the nose outward is easiest I think. Go ahead and follow the full path you want the eyeshadow to follow, but your brush will probably be running dry at the end of the stroke. Pick up some more eyeshadow on your brush and start from the center of your eye and make a stroke outwards to fill in from your last stroke. Grab some more eyeshadow and go back over everything again, blending the separate strokes together.
.
Now you can fill in the upper stroke or darker stroke, whichever it happens to be. You can blend the colors together in the center of your eyelid a bit, but it won’t matter too much if you don’t – you rarely ever see that part of a person’s eyelid anyway!
.
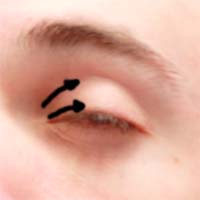
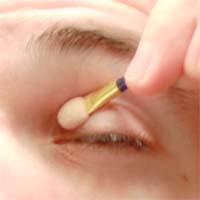
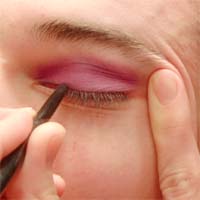
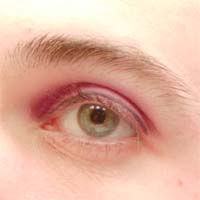
 Ok, now time for eyeliner, another tricky task. Eyeliner is (usually) really dark!! That means anywhere it goes, it’s going to show up. So all you have to do is make sure it only goes where you want it to . . . I know, easier said than done if you’ve ever tried before, but you’ll be surprised how easy it really is with this little trick . . . Stretch your eyelid out to the side (see the pic). The idea here is to make the bottom edge of your eyelid taught – pull out all the wrinkles, and keep it from moving under the drag of the eyeliner pencil. Also notice the beautiful two-tone eyeshadow that’s been applied in this photo
 ![]()
.
 Ok, I know I said it’s easy, but you still have to be careful . . . apply your eyeliner S-L-O-W-L-Y, keep it as close to the edge of your lashes as you possibly can, and don’t worry about using a continuous stroke. It’s much more important to adjust your grip on your eyelid skin with your off hand to make sure it doesn’t start moving or bunching from the drag of the pencil. The eyeliner should be dark enough that you won’t even have to bother blending the different strokes together, so start and stop often, checking your progress as you go.
.
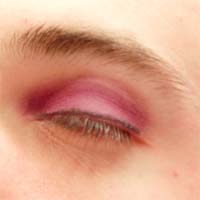
With a little luck, your eyes will look like the below pictures (eyes closed, and eyes open). It might take a few times, but don’t worry, you’ll get there.
.
.
Ok, last step is mascara. No pics of this, but I think you’ll figure it out. The trick with mascara is to brush from the base of the lashes outwards, and to twirl the brush as you move it. Rotating the brush makes sure that you get good contact between as many brush surfaces as possible with your lash. Make sure you keep the lashes as parallel as you can, and use 2 strokes, one for your inside lashes (near your nose) and one for your outside lashes. And don’t forget your bottom lashes! You probably don’t need to twirl the brush on the bottom lashes, a few short strokes should do nicely.
.
Some people say you should move the mascara brush back and forth as you take a stroke, but a) this is only necessary if you have a *really* crappy mascara brush, and b) it encourages clumping both of the mascara, and your lashes. Don’t let your lashes stick together when applying mascara (thus keeping them parallel). If you remember that, you’ll be fine.
.
And that’s it, now you should have gorgeous crossdresser eyes ![]()