Innocent Eye Makeup
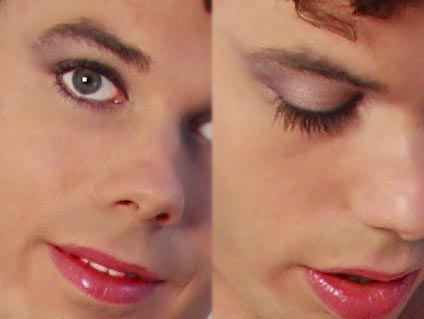 Here’s a great new eye makeup style that I learned about which creates a very subtle and innocent look. I tried it out for the first time today, and I’m pretty happy with the results
 ![]() There are two major lessons here that I will probably apply to other styles as well. First is applying a horizontal gradient across the eyelid . . . previously I had always used a vertical gradient (ie from lashes up to eyebrow) because it seems “natural”, but it turns out that a horizontal gradient (ie from nose outwards) does a great job of softening shadows that fall on your face – perfect for that “innocent” look, and also great for generally making you look younger. Second is using a similar technique for eyeliner on the bottom lid. I’d always had a hard time with eyeliner looking too dark on my lower lid, but if I didn’t add any at all then my eye lacked definition. Believe it or not, creating a horizontal gradient with your eyeliner is also a great makeup trick!
There are two major lessons here that I will probably apply to other styles as well. First is applying a horizontal gradient across the eyelid . . . previously I had always used a vertical gradient (ie from lashes up to eyebrow) because it seems “natural”, but it turns out that a horizontal gradient (ie from nose outwards) does a great job of softening shadows that fall on your face – perfect for that “innocent” look, and also great for generally making you look younger. Second is using a similar technique for eyeliner on the bottom lid. I’d always had a hard time with eyeliner looking too dark on my lower lid, but if I didn’t add any at all then my eye lacked definition. Believe it or not, creating a horizontal gradient with your eyeliner is also a great makeup trick!
.
Step 1:
 Ok, first step is to apply a base layer of the lightest color you will be using. Always start light and layer on darker colors, regardless of which direction your gradient goes. If you do it the other way around, you will have a hard time with smudges and streaks. To get a nice innocent look, I started with a base layer of white eyeshadow and filled my entire upper lid from lash to brow. I also added a streak of white on my lower lid. Be careful adding light colors on your lower lid though, because whites and silvers have a tendency to accentuate wrinkles (and most people have some wrinkles under their eyes even when they are relatively young). If you can’t pull off white or silver, try a brown that’s lighter than your skin tone.
.
Step 2:
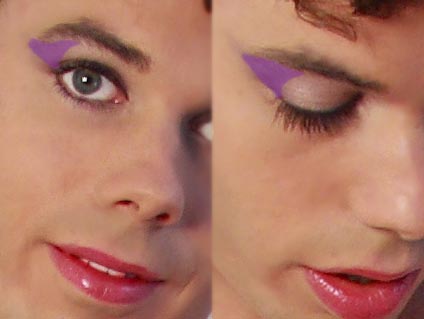 Next step is to add the gradient. Select a darker color (purples or blues work great for this) and “dab” it into your eyelid on the outer edge. This keeps the lighter color towards your nose where shadows tend to form, thus counteracting the shadows and softening your face. Anyway, dab away, but don’t blend or smudge – you’ll end up with way too much color and the darker shade will just go everywhere. Dab dab dab. You don’t need much eyeshadow for this. Also follow the line of your eye *up* your cheek a bit – this will elongate your eye a bit, but make sure you go up your face so you don’t make your eyes look droopy!
.
Step 3:
 I’m going to break my own advice here on step 3, and I don’t have a good justification for it. Just trust me :p Ok, grab your black eyeliner (or black eyeshadow with a thin tight brush) and trace your upper lash line like you normally would. You want a nice thin line because most of your eyelid is a very light color that you don’t want to overwhelm. Work from the inside edge outwards, and be sure to pull your skin taught. to keep the line crisp. Now on to your bottom lid, start from the *outside* edge and work your way about 3/4 the way across your eye. No further, just 3/4 the way across!
.
Step 4:
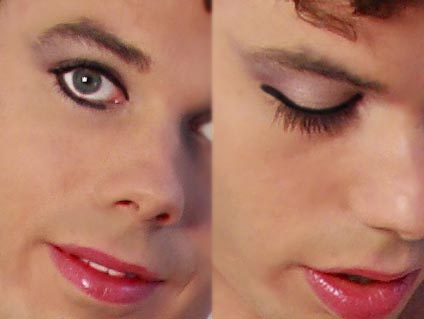
 Ok, now grab a bright white eyeshadow, preferably brighter than what you coated your eye with. Using a small tight brush, start from the inside edge of your lower eyelid and pull a single thin line of white out towards where you stopped with the black eyeliner. You’ll want to go about halfway across your eye (overlapping the black), but allow the white to fade out into the black eyeliner where they overlap. This should create a nice gradient that brightens up the lower inside corner of your eye. It will make you look more awake and perky
 ![]()
.
That’s all there is to it! Now you have perfect eyes for a schoolgirl outfit, wedding, or any other innocent look.
Tags: eye makeup, eyeliner, eyeshadow, gradient, innocent, schoolgirl, wedding, white eyeshadow —